Databricks
Driver Options
Databricks - Download the ODBC driver directly from the provider’s site: Databricks ODBC Driver.
Posit Professional Drivers - Posit Workbench, RStudio Desktop Pro, Connect, or Shiny Server Pro users can download and use Posit Professional Drivers at no additional charge. These drivers include an ODBC connector for Databricks. Posit delivers standards-based, supported, professional ODBC drivers. Use Posit Professional Drivers when you run R or Shiny with your production systems. See the Posit Professional Drivers for more information.
Package Options
The odbc package, in combination with a driver, provides DBI support and an ODBC connection.
There are two methods for making a connection to Databricks using the odbc package:
- Using
odbc::databricks()(Recommended) or - Using
odbc::odbc()
Using the new odbc::databricks() function
Starting with version 1.4.0, the odbc package makes it much easier to connect to Databricks. The new databricks() function has built-in ways to determine, and set most of the necessary connection settings. This method for connecting should be used whenever possible over the more generic approach of using odbc::odbc().
Ideally, httpPath should be the only argument you need to run databricks(). That argument should contain the Databricks SQL Warehouse path which you can obtain in the Databricks Web UI. For help with navigating to where to find this value see: Databricks HTTP Path. Alternatively, you may wish to connect via ODBC to a running Databricks cluster, for instructions on how to get the HTTP Path from the cluster, see the Get connection details form a cluster section from the Databricks instructions page.
Additionally, you will need your Host URL and a way to authenticate:
Your organization’s Host URL within Databricks — If you do not wish to use the
workspaceargument every time, save the value to theDATABRICKS_HOSTenvironment variable. To set this at your user level, meaning the same one for all your projects, useusethis::edit_r_environ()and add the following to the resulting file:DATABRICKS_HOST="[Your organization's Host URL]"Credentials —
databricks()tries to find your credentials in a specific order:- ‘DATABRICKS_TOKEN’ environment variable - To set this at your user level, use
usethis::edit_r_environ()and append the following:DATABRICKS_TOKEN="[Your personal Databricks token]" - OAuth2 machine-to-machine authentication - If you have M2M authentication already setup,
databricks()will find and use that as your credentials. - Posit Workbench integration (2023.12.0 or later) - If you have the Databricks OAuth integration that is included with Posit Workbench,
databricks()will use that for your credentials. - Databricks CLI - If you are using the RStudio IDE locally and have the Databricks CLI setup,
databricks()will attempt to get your credentials that way.
- ‘DATABRICKS_TOKEN’ environment variable - To set this at your user level, use
With the above two values set, a connection to Databricks will look like:
con <- DBI::dbConnect(
  odbc::databricks(),
  httpPath = "[SQL Warehouse service path]"
  )
Using the odbc::odbc() function
A connection to Databricks can be established with the more generic odbc::odbc() function. There are 10 arguments needed to make a connection using this method:
- Driver - See the Drivers section for setup information
- Host - Your organization’s Host URL within Databricks
- Port - Typically set to 443
- AuthMech - Choose 3 in order to use a PAT token for your credentials
- HTTPPath - This is the path to the machine that will serve as the SQL server. See Databricks HTTP Path to help with getting this value.
- Protocol - Typically set to https
- ThriftTransport - Set to 2
- SSL - Set to 1
- UID - Set to “token”, if using 3 as the AuthMech
- PWD - Your personal Databricks Token (PAT). Use an environment variable to avoid passing in plain credentials in your code. We suggest the name
DATABRICKS_TOKEN, which follows consistent form for many other APIs that interact with Databricks. - catalog - Not required, but it makes it easy for the RStudio IDE to display the schema and tables you want to navigate through
con <- DBI::dbConnect(
  odbc::odbc(),
  driver          = "[The file path to your driver]",
  host            = "[Your organization's Host URL]",
  port            = 443,
  authMech        = 3,
  httpPath        = "[SQL Warehouse service path]",
  protocol        = "https",
  thriftTransport = 2,
  ssL             = 1,
  uid             = "token",
  pwd             = Sys.getenv("DATABRICKS_TOKEN"),
  catalog         = "[Catalog you wish to connect to]"
  )
Troubleshooting: Apple macOS users
If you receive an error message similar to this when attempting to connect, please read this section:
Unable to locate SQLGetPrivateProfileString function: [Simba][Support] (50483)
Could not load shared library, all attempted paths ("") failed
This is likely happening because the driver can’t locate the ODBC Driver Manager, which acts as the interface between an ODBC application (R), and an ODBC driver (your new Databricks driver).
To solve this issue:
Locate the Driver Manager library. Search for a file called libodbcinst.dylib in the ‘/usr/local/lib/’ folder.
- If it is not there, then install it via Homebrew in the terminal:
brew install unixodbc. - After installing, use:
brew --prefix unixodbcto find out where Homebrew installed it. The libodbcinst.dylib file should be inside the ‘lib’ sub-folder.
- If it is not there, then install it via Homebrew in the terminal:
Open the driver configuration file to edit. By default the file will be located here: ‘/Library/simba/spark/lib/simba.sparkodbc.ini’.
Append the following two lines at the end:
ODBCInstLib=[Location of your libodbcinst.dylib file]
DriverManagerEncoding=UTF-16
The second entry is to avoid output that may be unreadable. For more information, please read our article Encoding for ODBC connections.
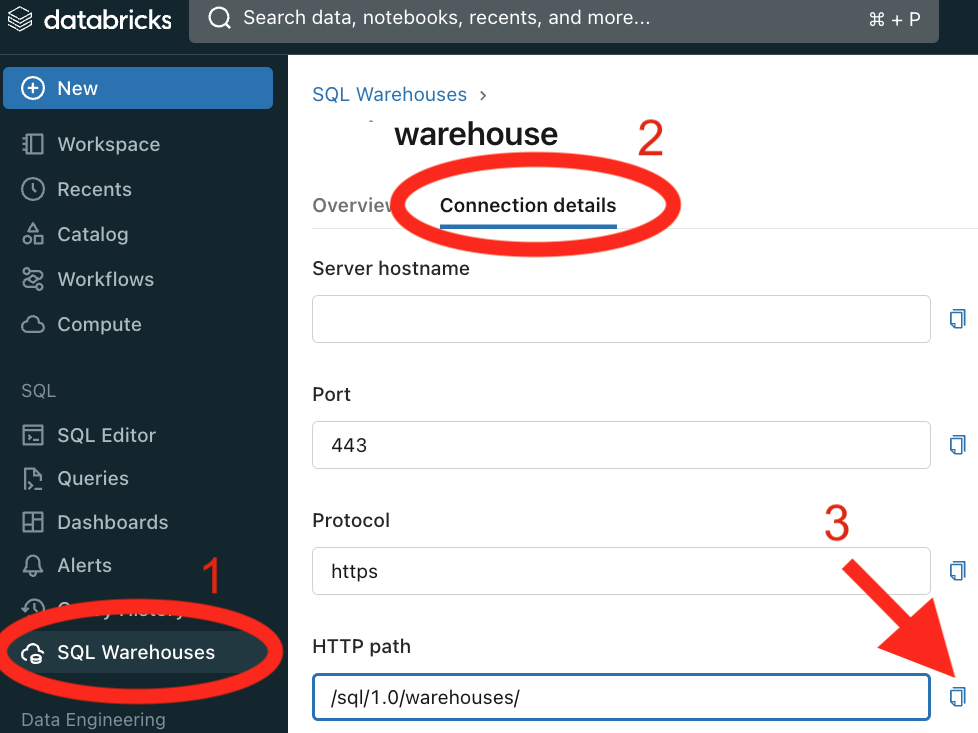
Databricks HTTP Path
Here are the steps to obtain the HTTP path, which is needed for the httpPath argument when connecting:
- Navigate to your Databricks web UI
- Select SQL Warehouses from the left menu
- In the interface to the right, select Connection details
- Copy the value under HTTP path
The following screenshot, and markers, show the location in the screen for each step:
More information
For more information, visit the Databricks documentation: